Filling in your services and completing your public sheet
Your public sheet presents your workshop to watch owners looking for a watchmaker on Watch Certificate™: your services and prices, your hours, your address. They can book an appointment with you there, even without a Watch Certificate™ account. This guide shows you how to fill in your services, then complete your sheet. In the screenshots, orange frames show where to click or what to fill in.
Questa guida è disponibile in inglese e in francese.
How it works
Add your services in My services: the price, on site or drop-off, the turnaround.
Complete your public information in Settings, My profile tab: public email, hours, description.
Save, then check the result with See my public sheet.
Answer the requests: a client picks a service and 2 or 3 time slots, for one of their watches or another one. You receive the request by email and have 72 hours to accept a slot, propose others or decline.
info
Good to know
Your sheet appears in the public directory once our team has validated your account, your password is set and your company name is filled in. The Make an appointment button shows on your sheet as soon as one service in the Appointments section is on, whether it comes from the list or is your own. Any visitor can then request an appointment with you, even without an account: their request reaches you once they have confirmed it from the email we send them.
Part A
Your services, in “My services”
Step 1: open “My services”
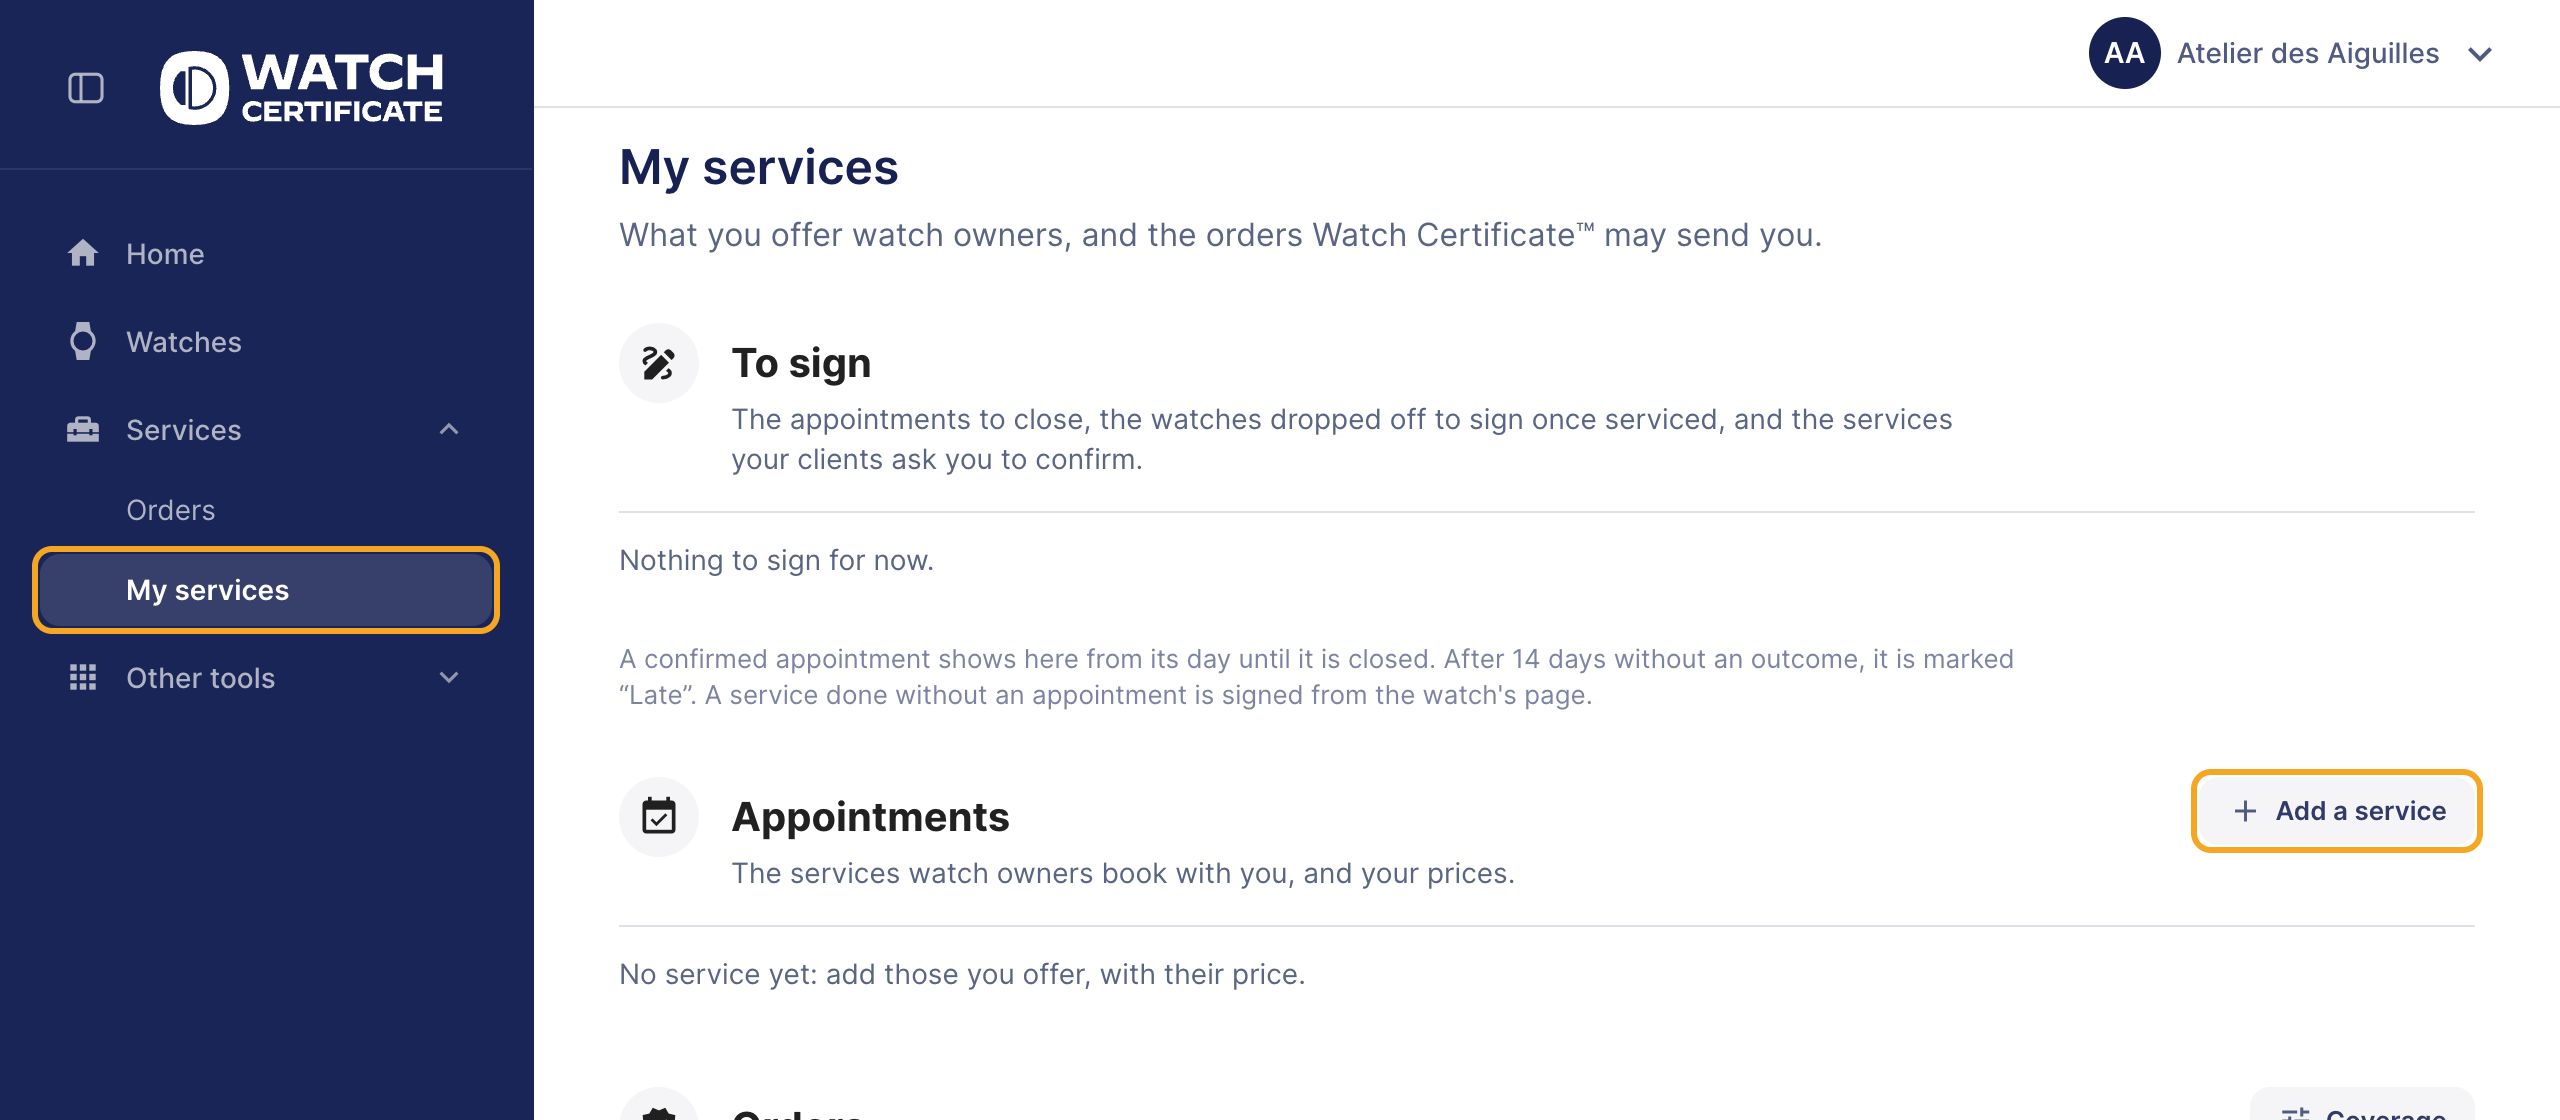
In the menu, open Services, then click My services. The page has three sections: To sign (the appointments to close and the services to sign), Appointments (the services watch owners book with you) and Orders (the certifications Watch Certificate™ may send you). In Appointments, click Add a service.
My services, in the menu's Services group, still empty, and the Add a service button.
Step 2: choose the service and its price
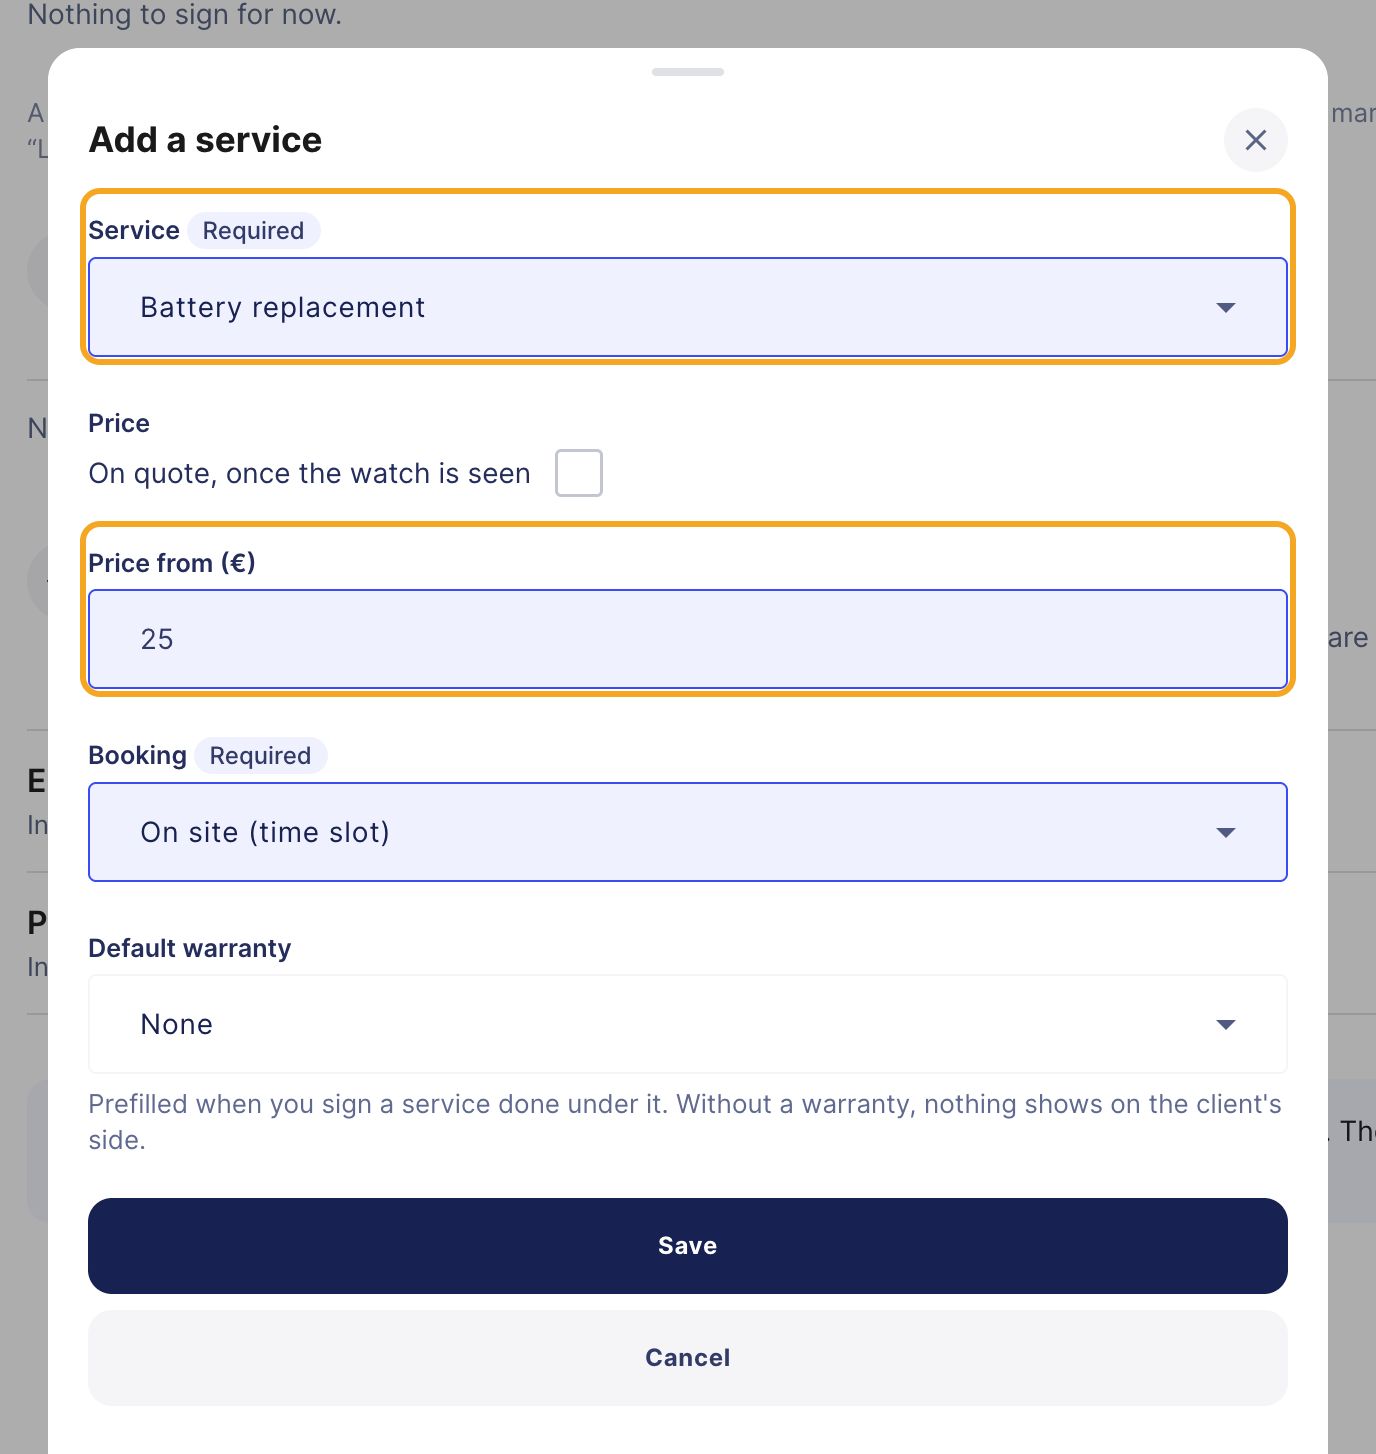
In Service, choose a service from the list, for example Battery replacement. Type your Price from (€): your clients read “From €25”. In Booking, keep On site (time slot) if the client comes at a time slot. Click Save.
A service on site, with its starting price.
Step 3: a service on quote or as a drop-off
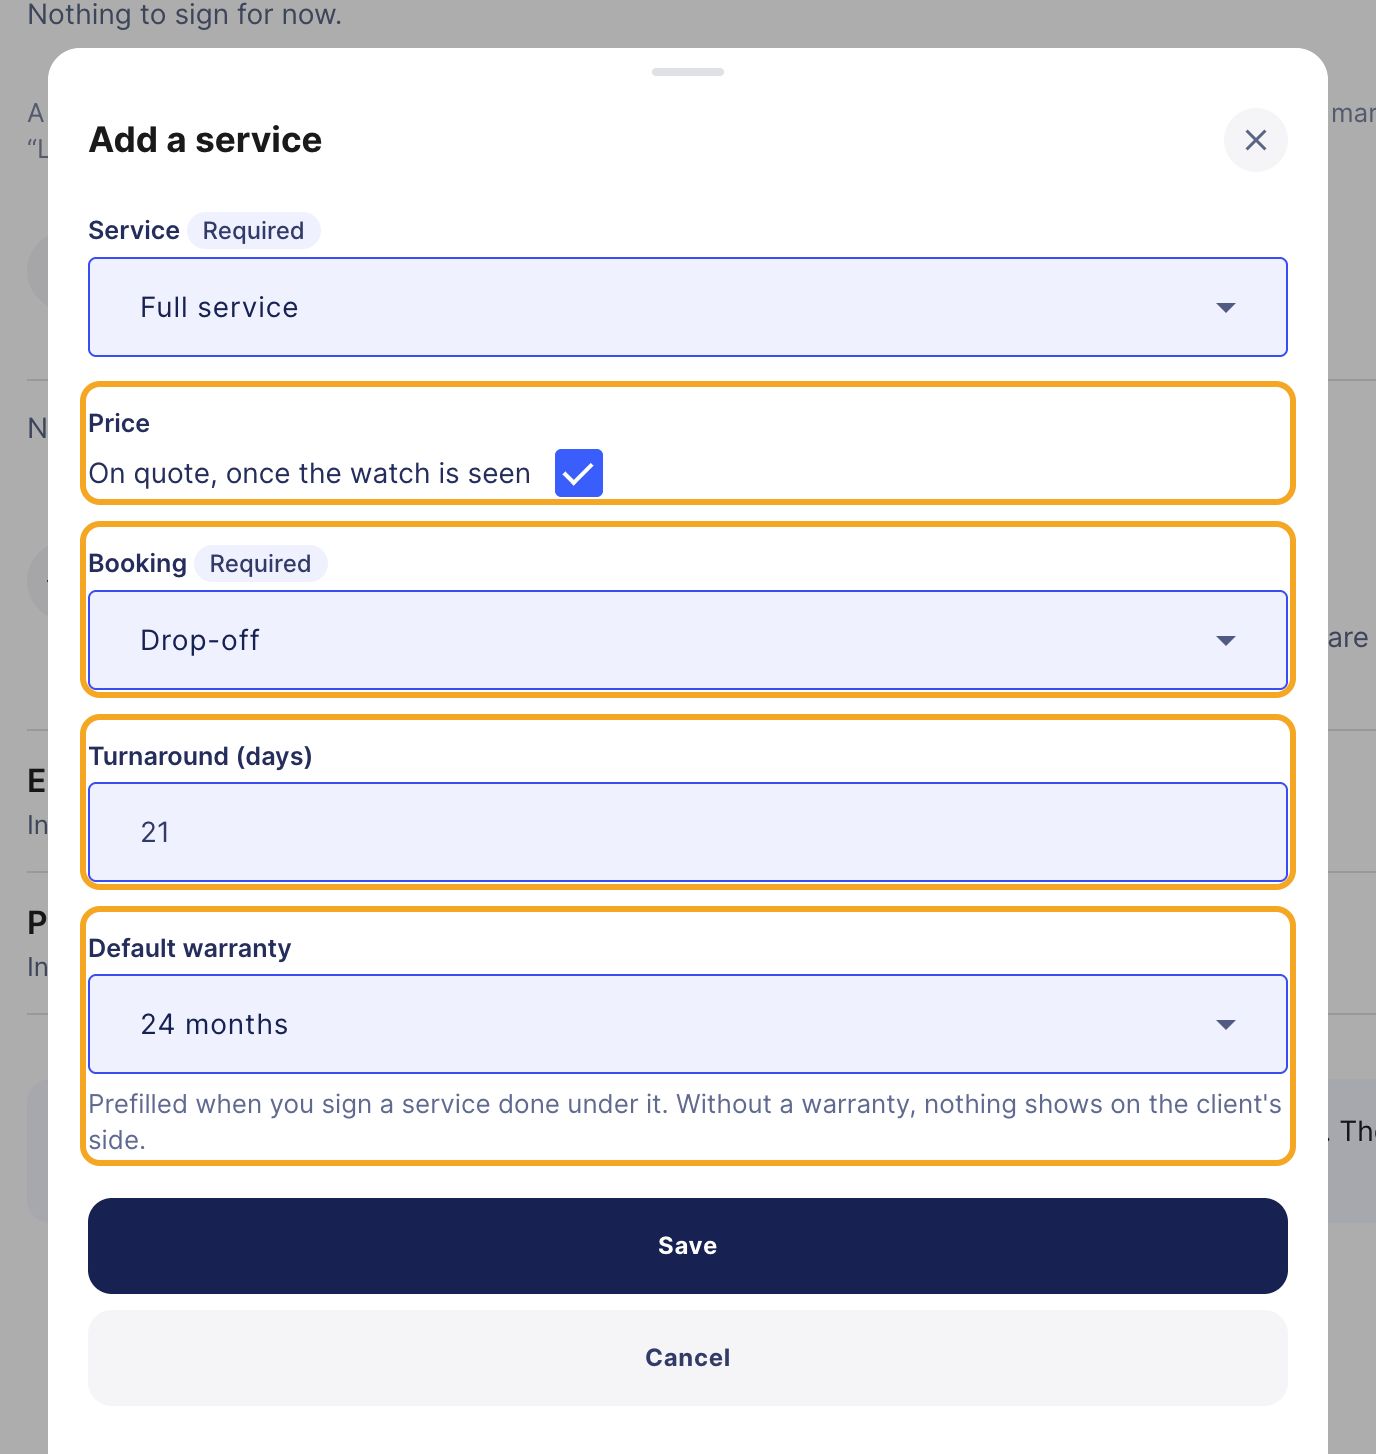
The price depends on the watch? Tick On quote, once the watch is seen: your clients read “On quote”. The watch stays with you? Choose Drop-off and enter the Turnaround (days), 365 at most. The Default warranty (6 to 36 months) is prefilled when you sign a service done under it.
A full service on quote, dropped off for 21 days, with a 24-month warranty.
Step 4: manage each service of the list
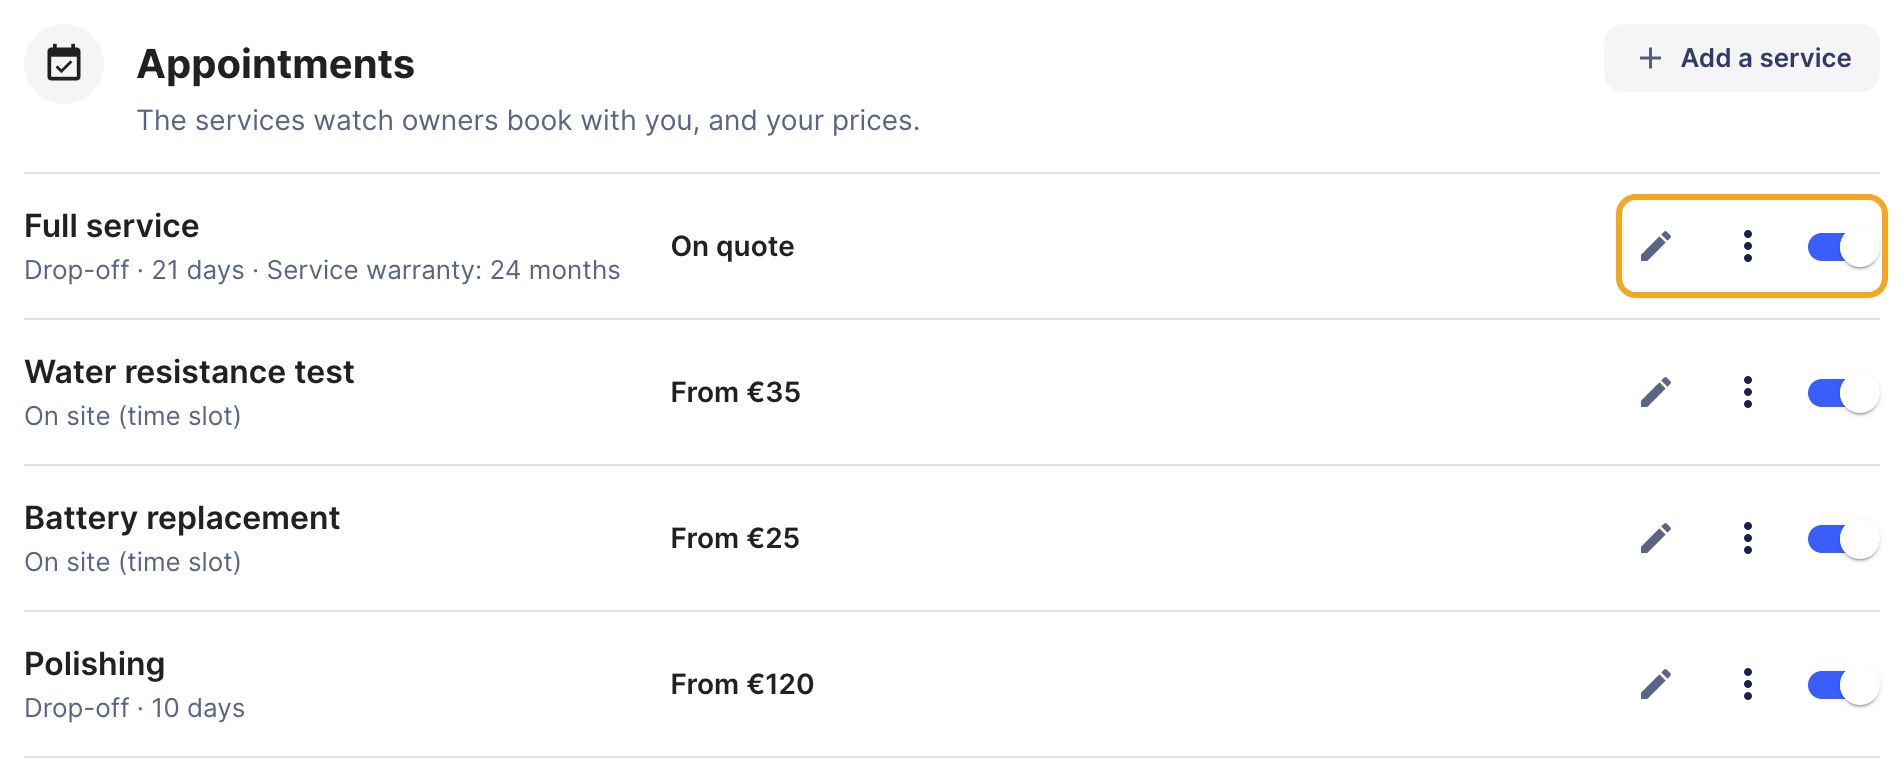
Each row shows the booking mode, the turnaround and the price. The Edit pencil opens the service again. The switch shows it to your clients or hides it: off, it keeps its price and you can turn it back on later. The ⋮ menu holds the other actions.
Four services on, and the buttons of the first row.
Step 5: remove a service you do not offer
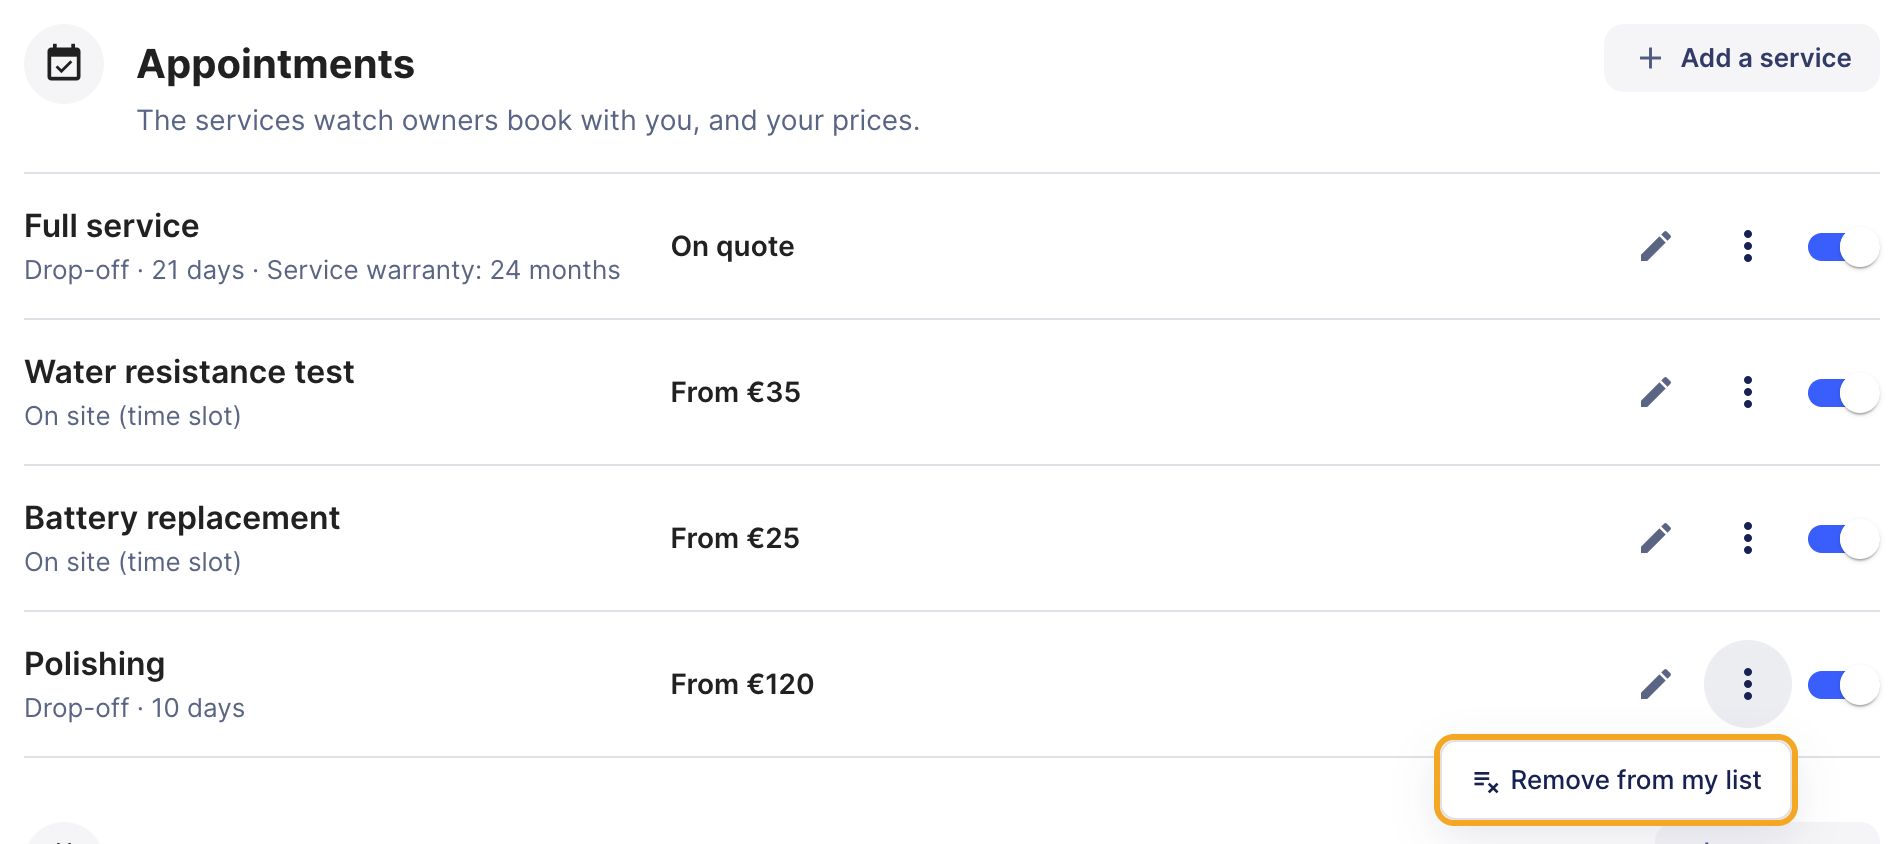
In a row's ⋮ menu, Remove from my list takes it out of your list. It moves under Removed from your list, where Put back brings it back, off.
A row's menu and the Remove from my list action.
Step 6: add a service that is not on the list
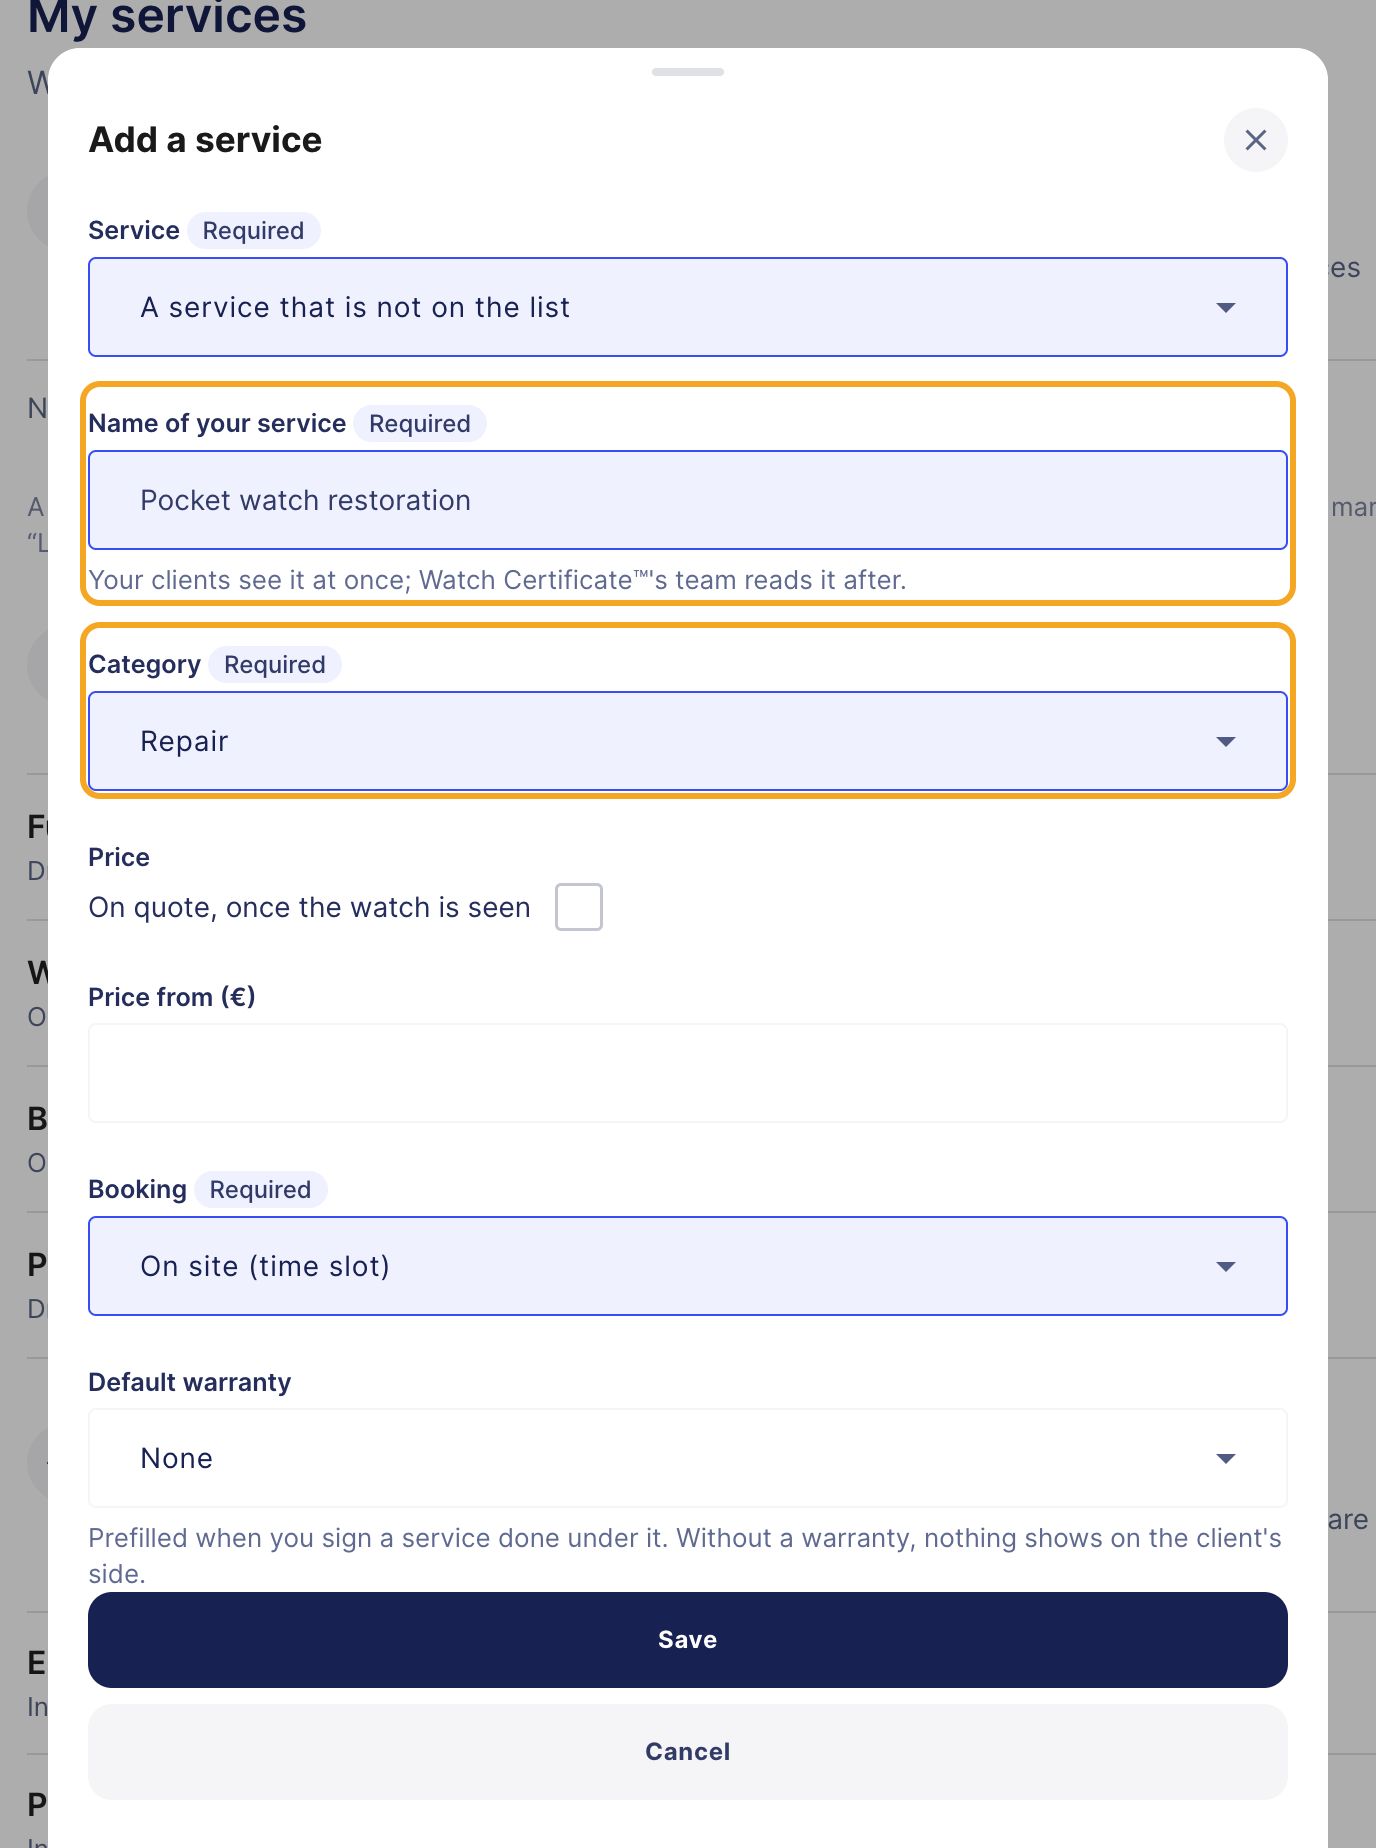
You offer something the list does not have? In Service, choose A service that is not on the list. Type the Name of your service (60 characters at most), choose its Category, then fill in the price and the booking as in step 2.
A service of your own: its name and its category.
Step 7: follow your own services
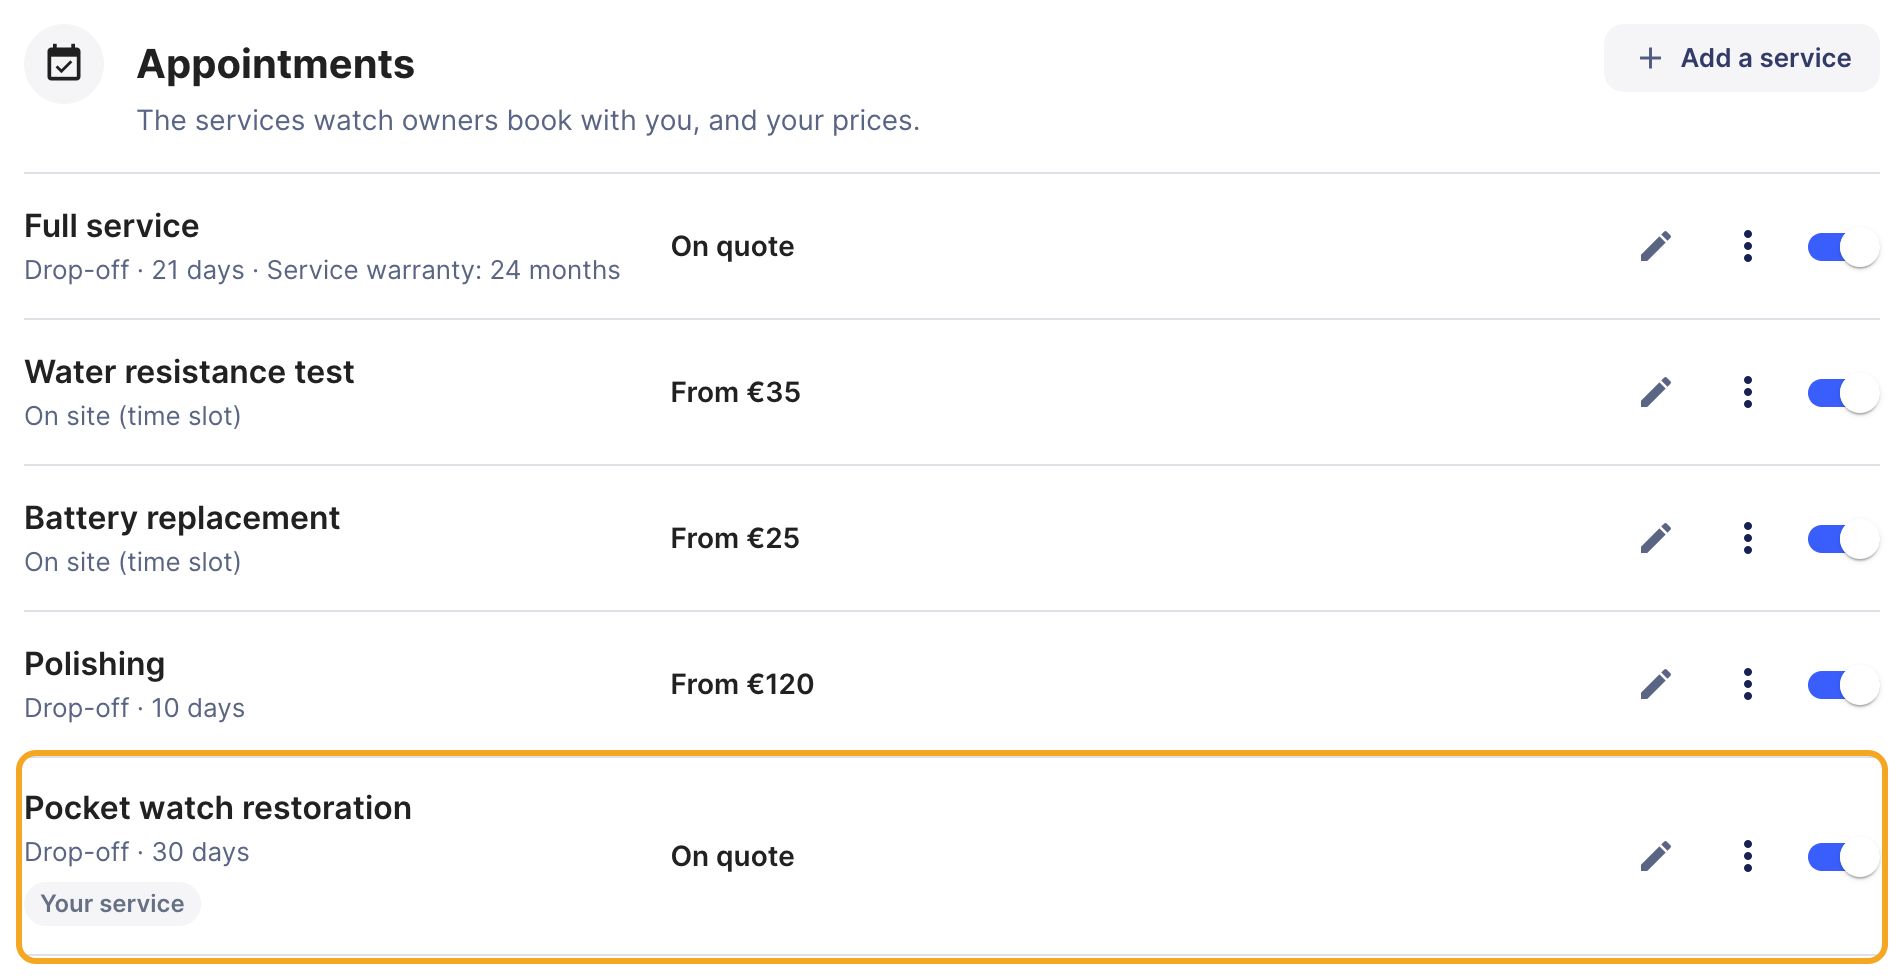
It carries the tag Your service. When it is on, it shows on your sheet at once and can be booked. Our team reviews it afterwards and may rename it, merge it with a service from the list or hide it. Once hidden, it carries the tag Hidden by Watch Certificate™ and your clients no longer see it. Its ⋮ menu offers Rename, and Delete once it is off and has never been used.
The pocket watch restoration, a service of your own.
warning_amber
Warning
Services of your own are for accounts validated by our team. A row with a lock, Set by Watch Certificate™, was set by our team: write to us to change it.
Step 8: check your orders
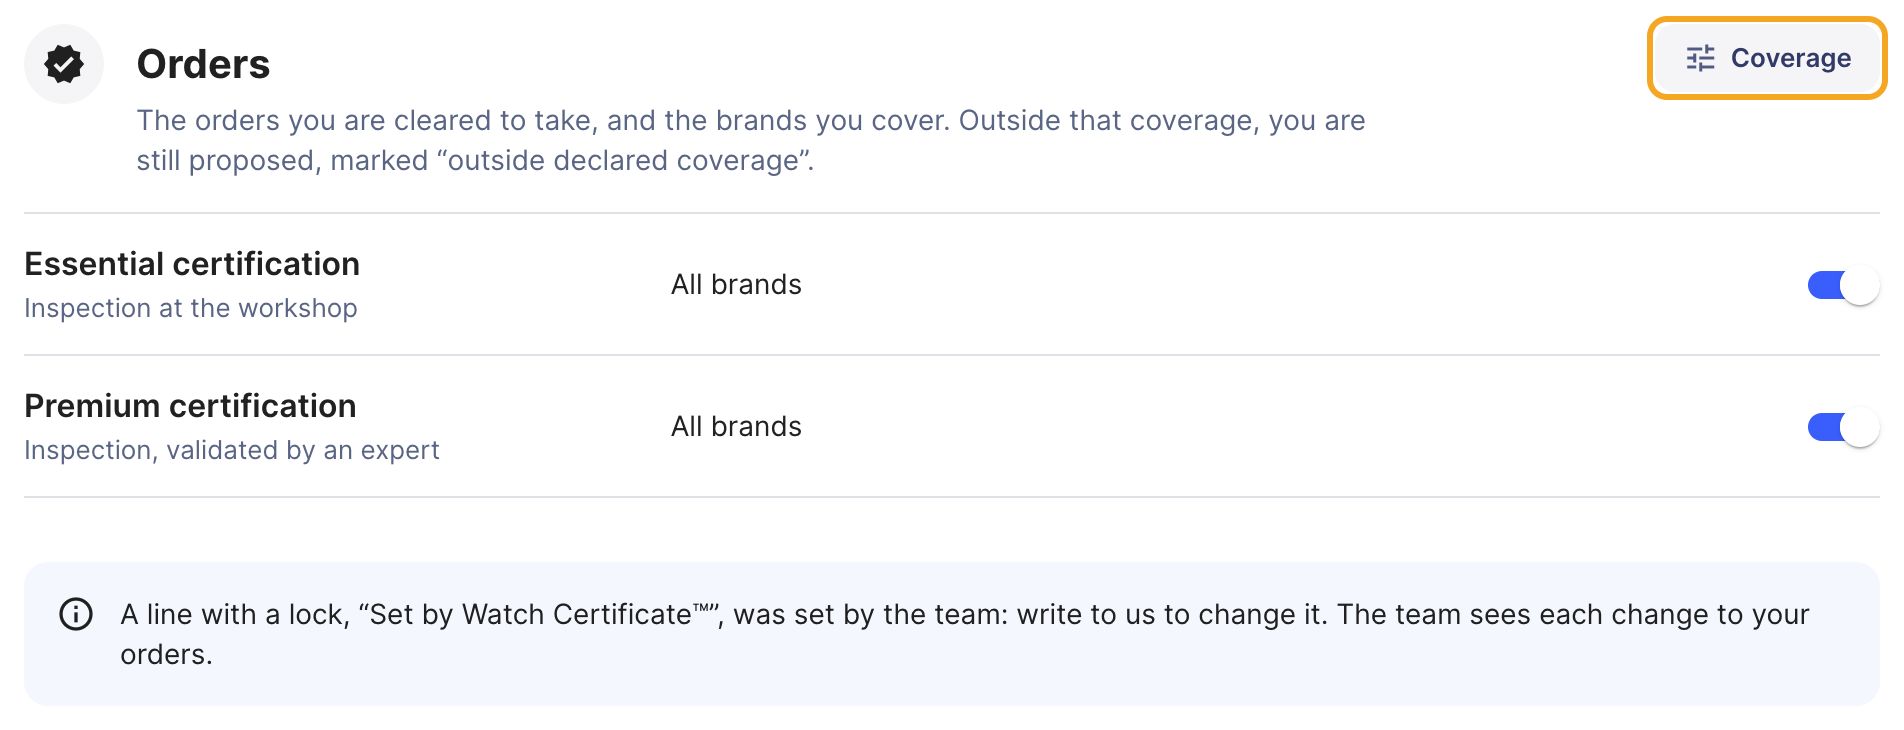
The Orders section lists the certifications you are cleared to take. Each row's switch says whether you accept them. Only the certifications open to your trade are listed. Click Coverage to set the brands you cover.
A workshop's orders and the Coverage button.
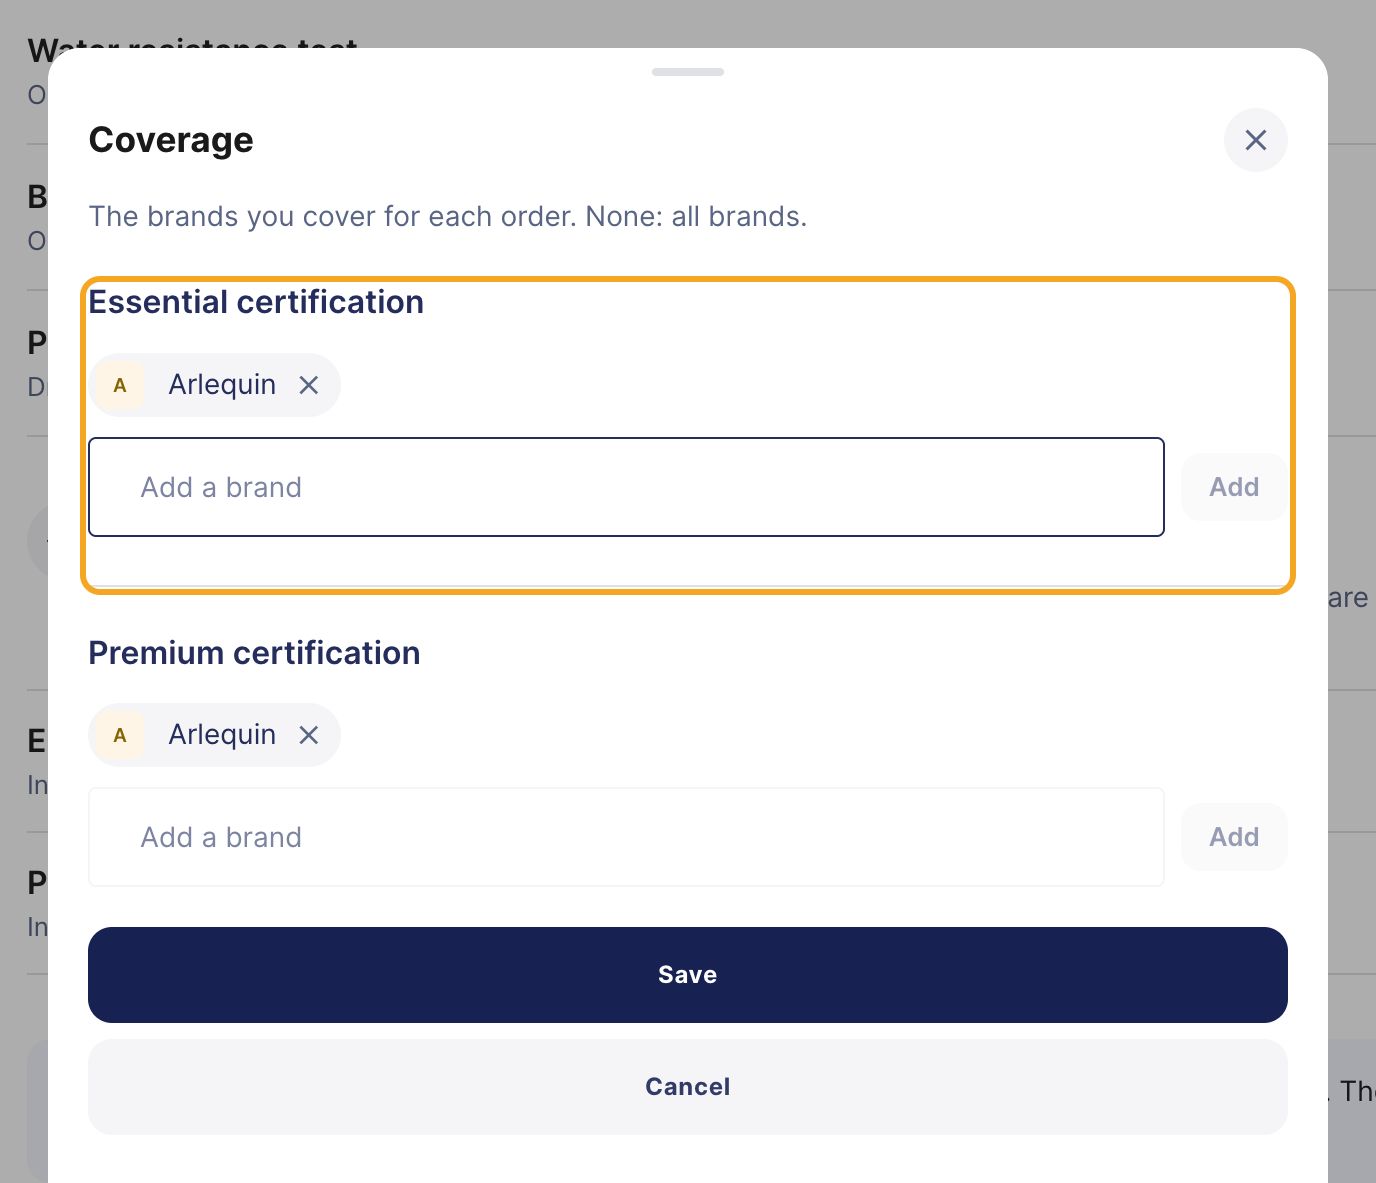
Step 9: set the brands you cover
For each order, add the brands you cover, then click Save. With no brand, the row stays at All brands. Outside your coverage, you are still proposed, marked “outside declared coverage”.
The coverage: the Arlequin brand for both certifications.
Part B
Your sheet, in “Settings”
Step 10: check your contact details
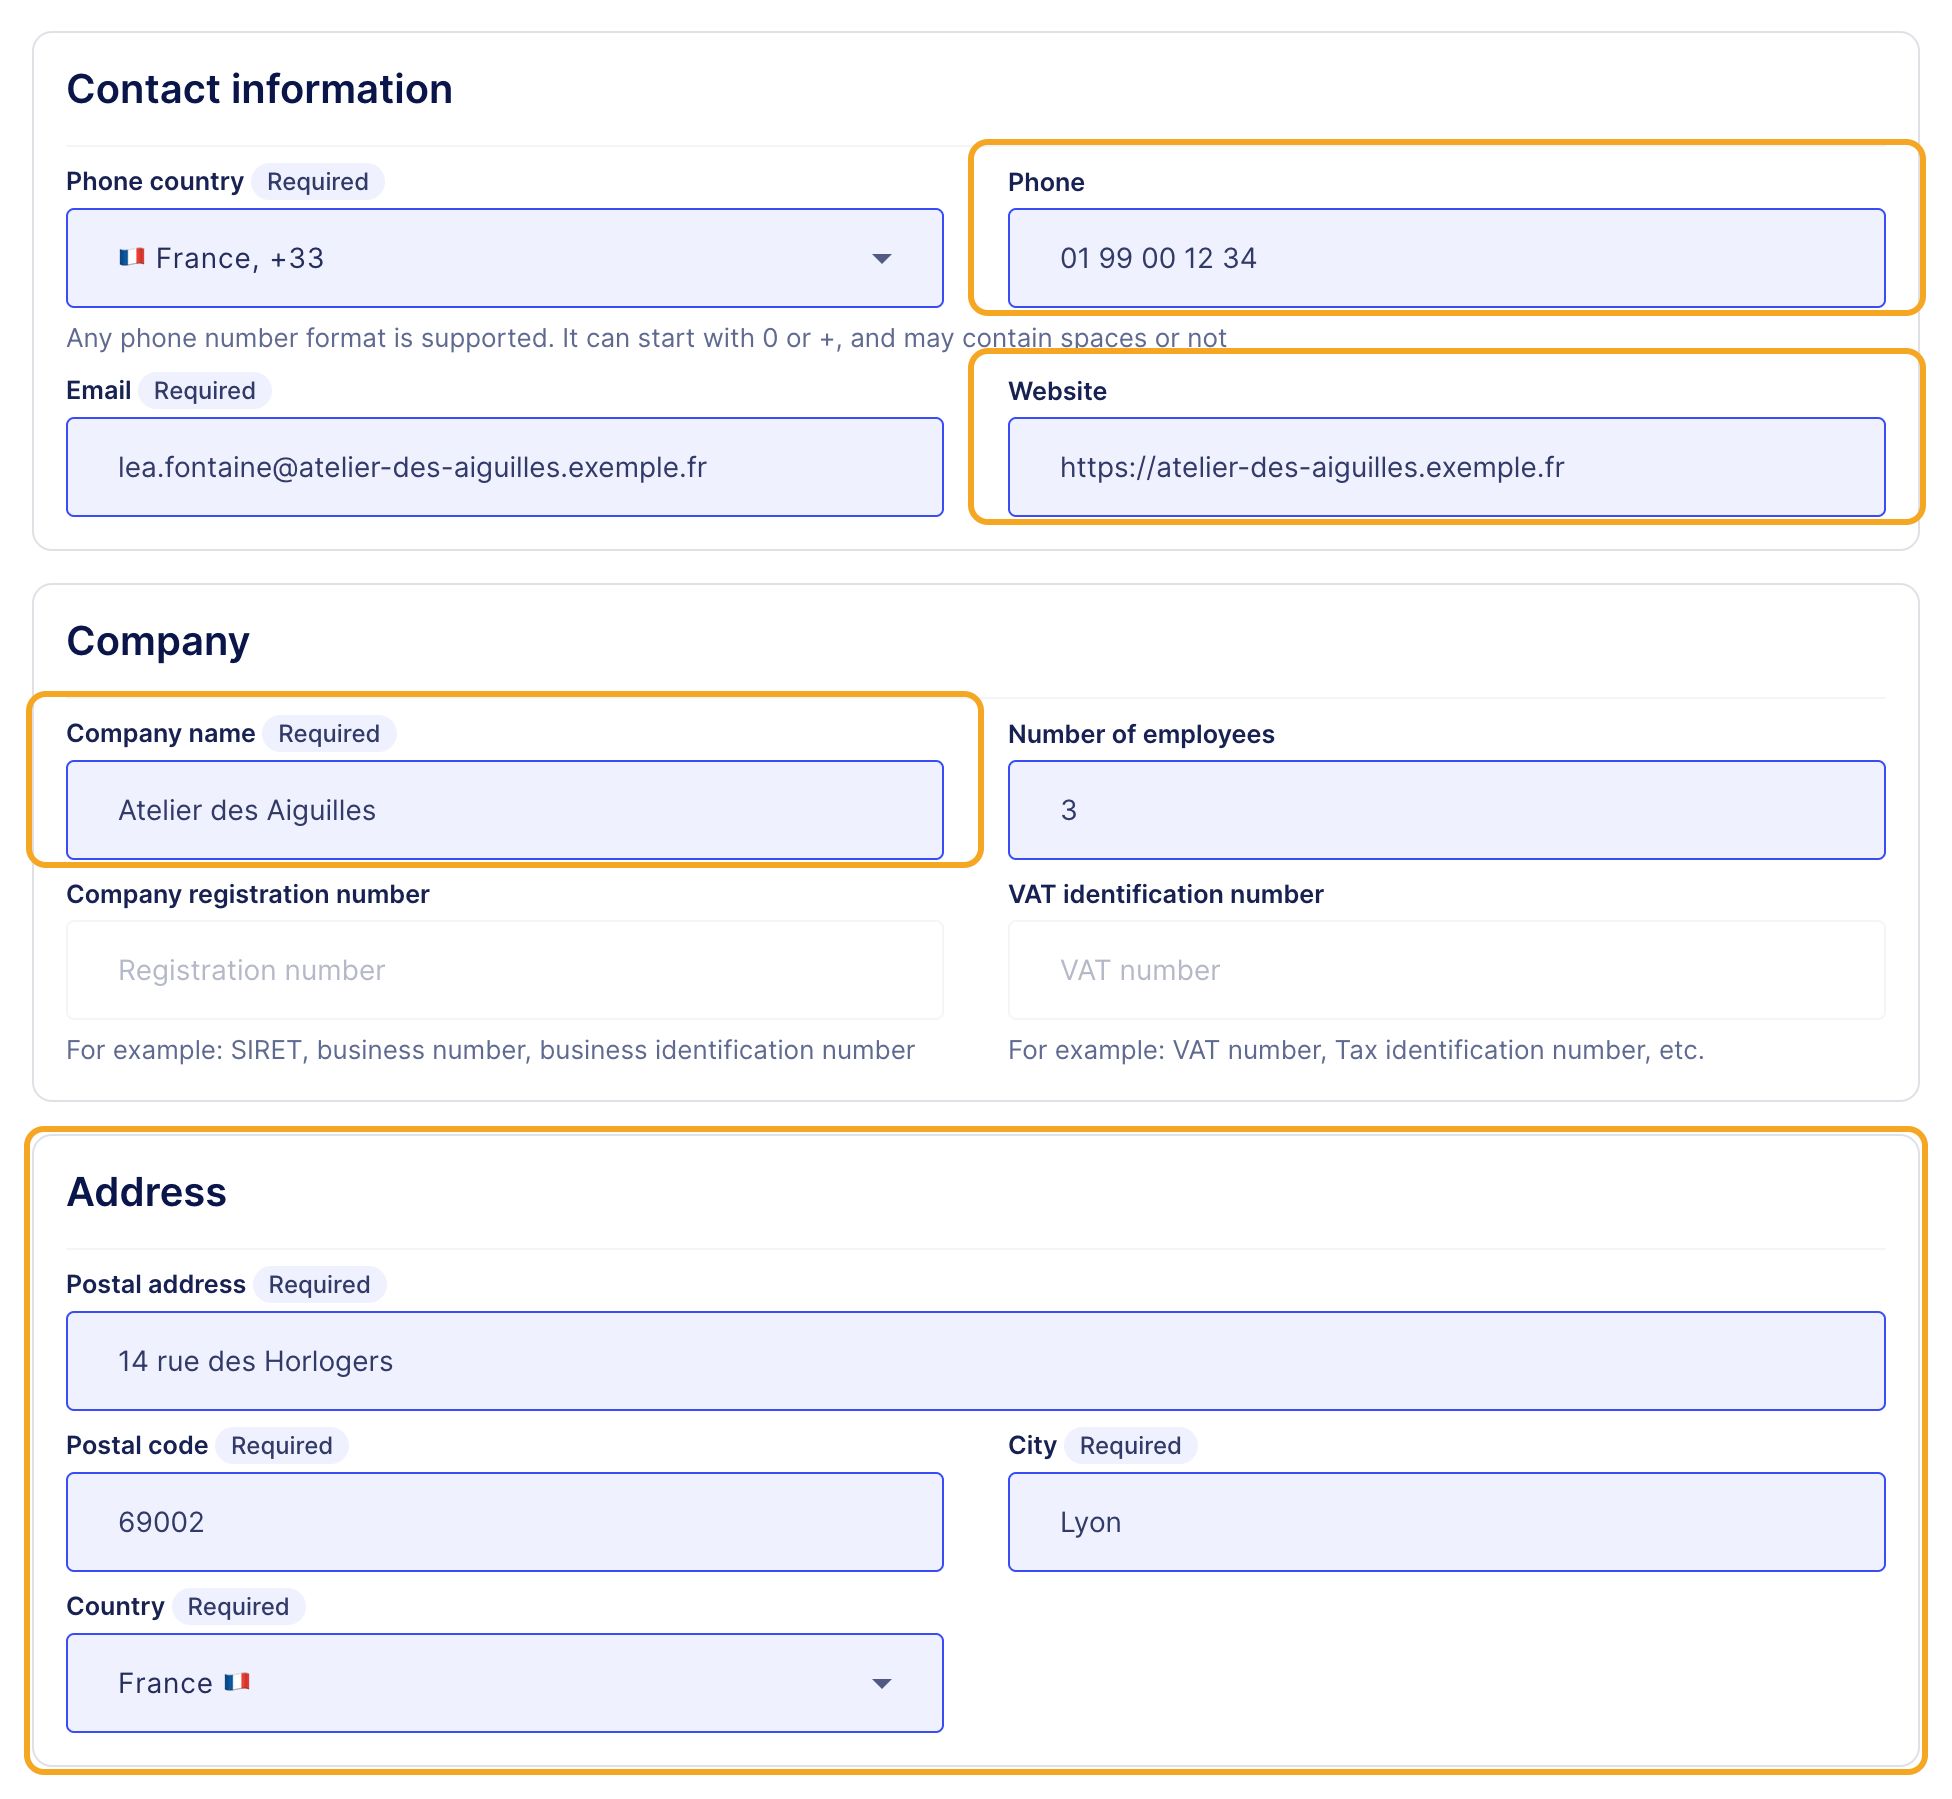
Open your avatar's menu, top right, then Settings, My profile tab. Your sheet shows the Phone, the Website, the Company name and the Address. Check them: they are what your clients will read.
The phone, the website, the name and the address, shown on your sheet.
Step 11: add a public email and your hours
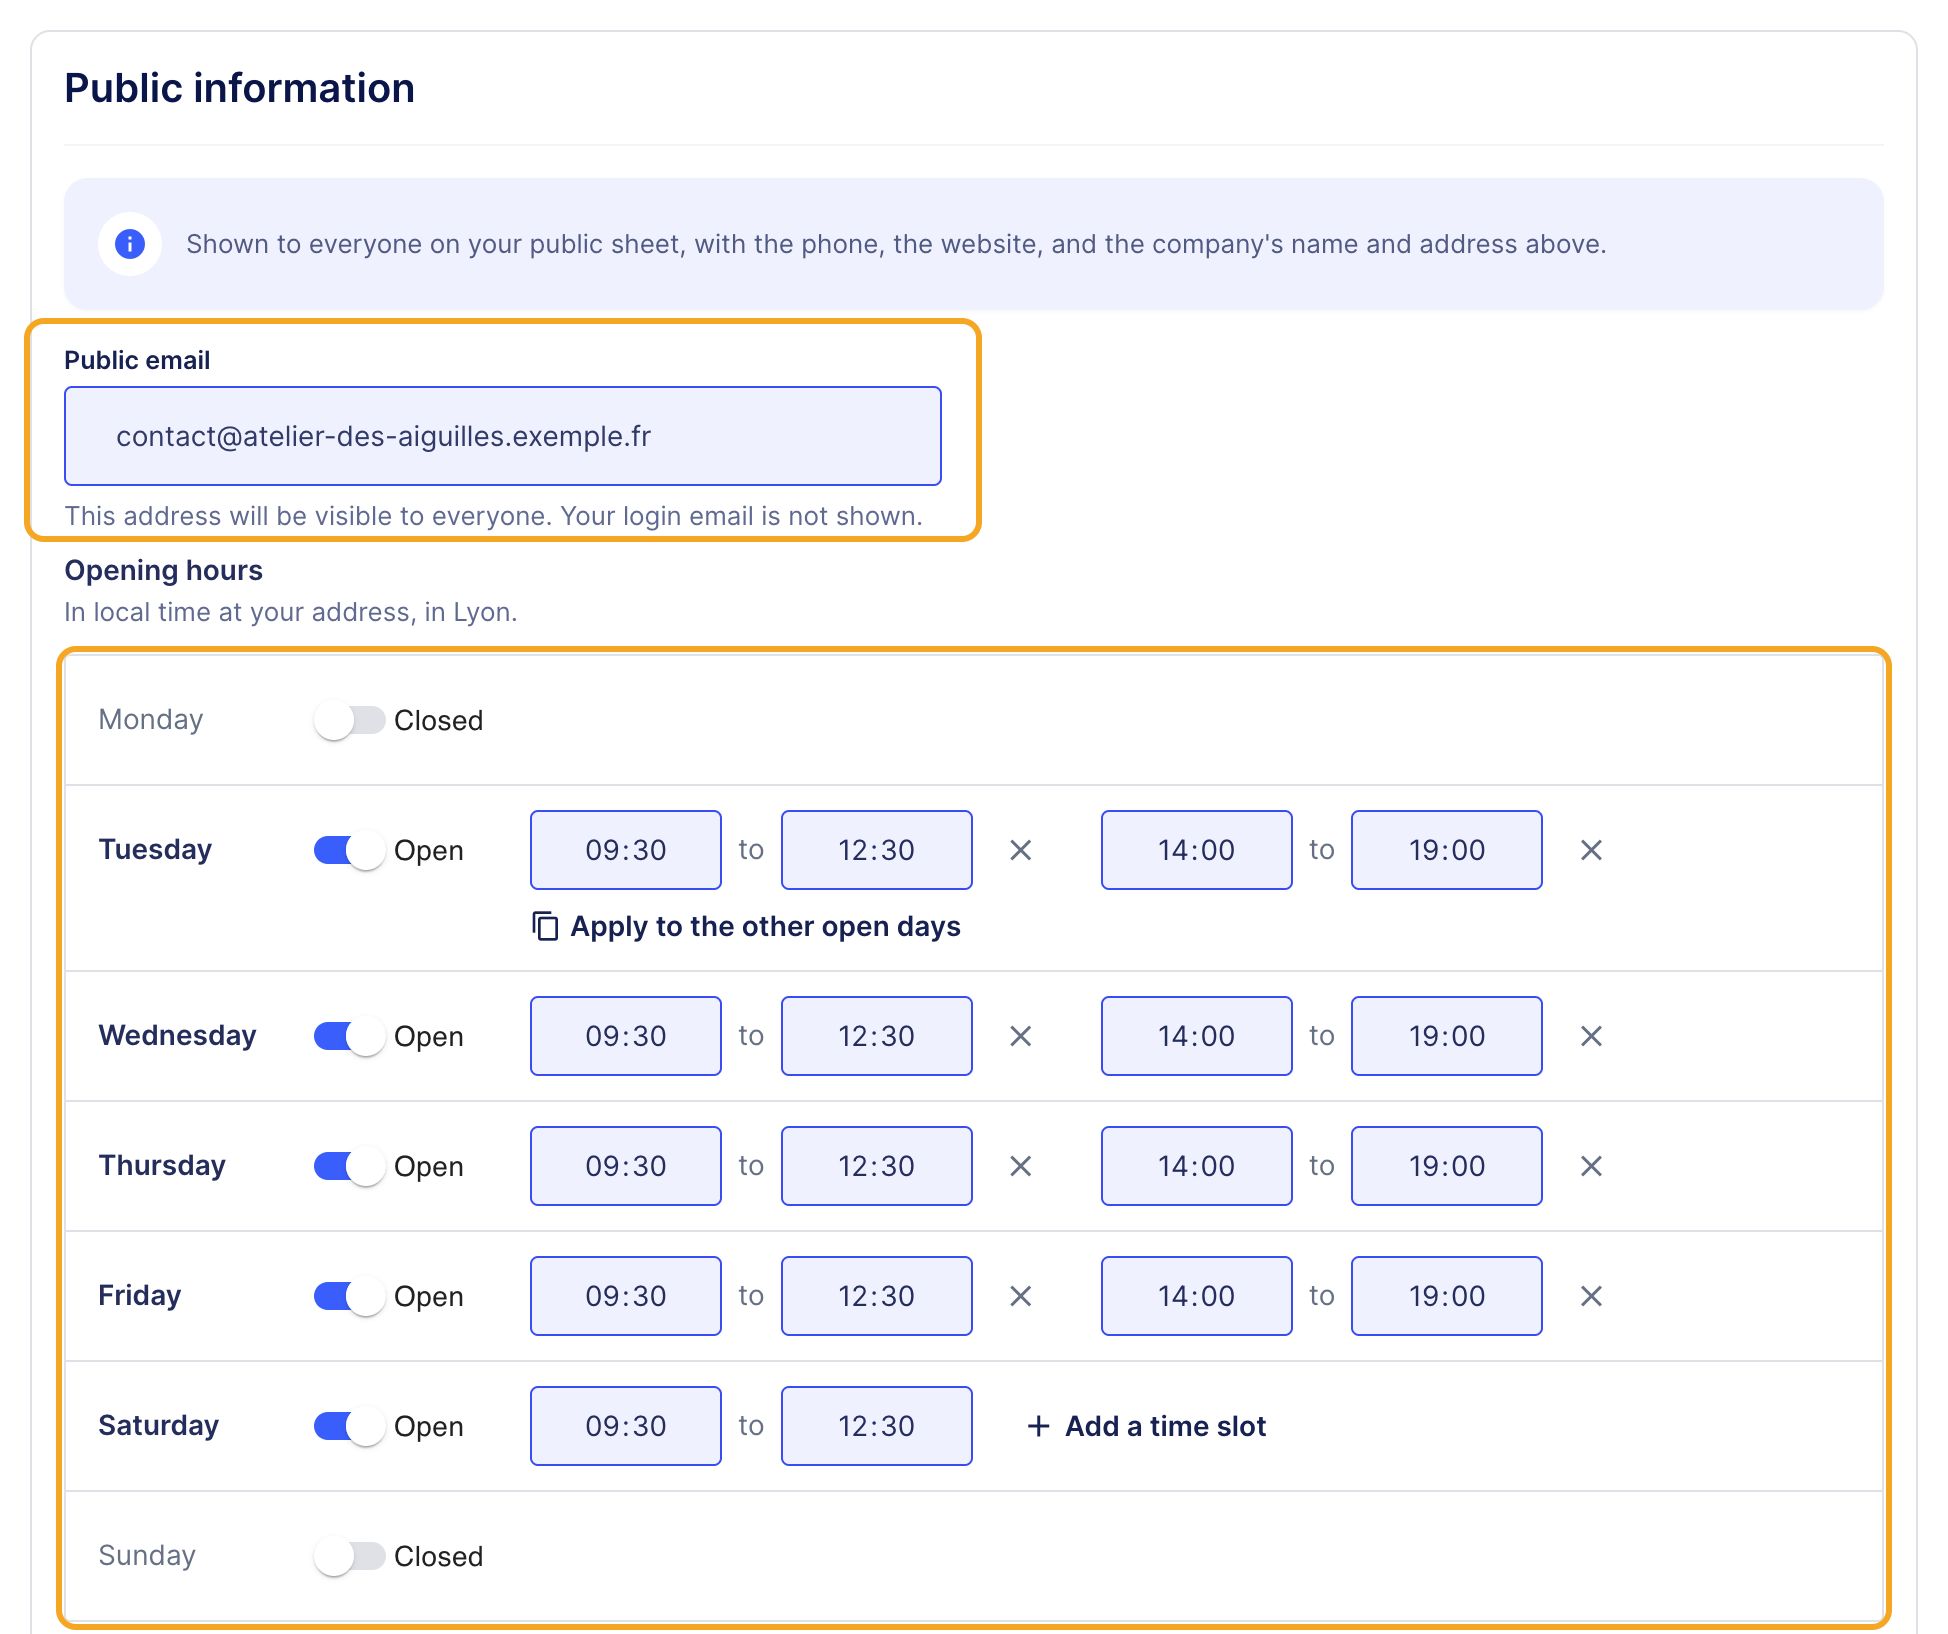
Further down, in Public information, type the Public email where your clients write to you: your login email is never shown. In Opening hours, open your days and type your time slots. Special dates and Temporary closure are for time off and public holidays.
The public email and the week's hours.
lightbulb
Tip
Fill in one day, then click Apply to the other open days: its time slots are copied to every open day.
Step 12: describe your workshop, then save
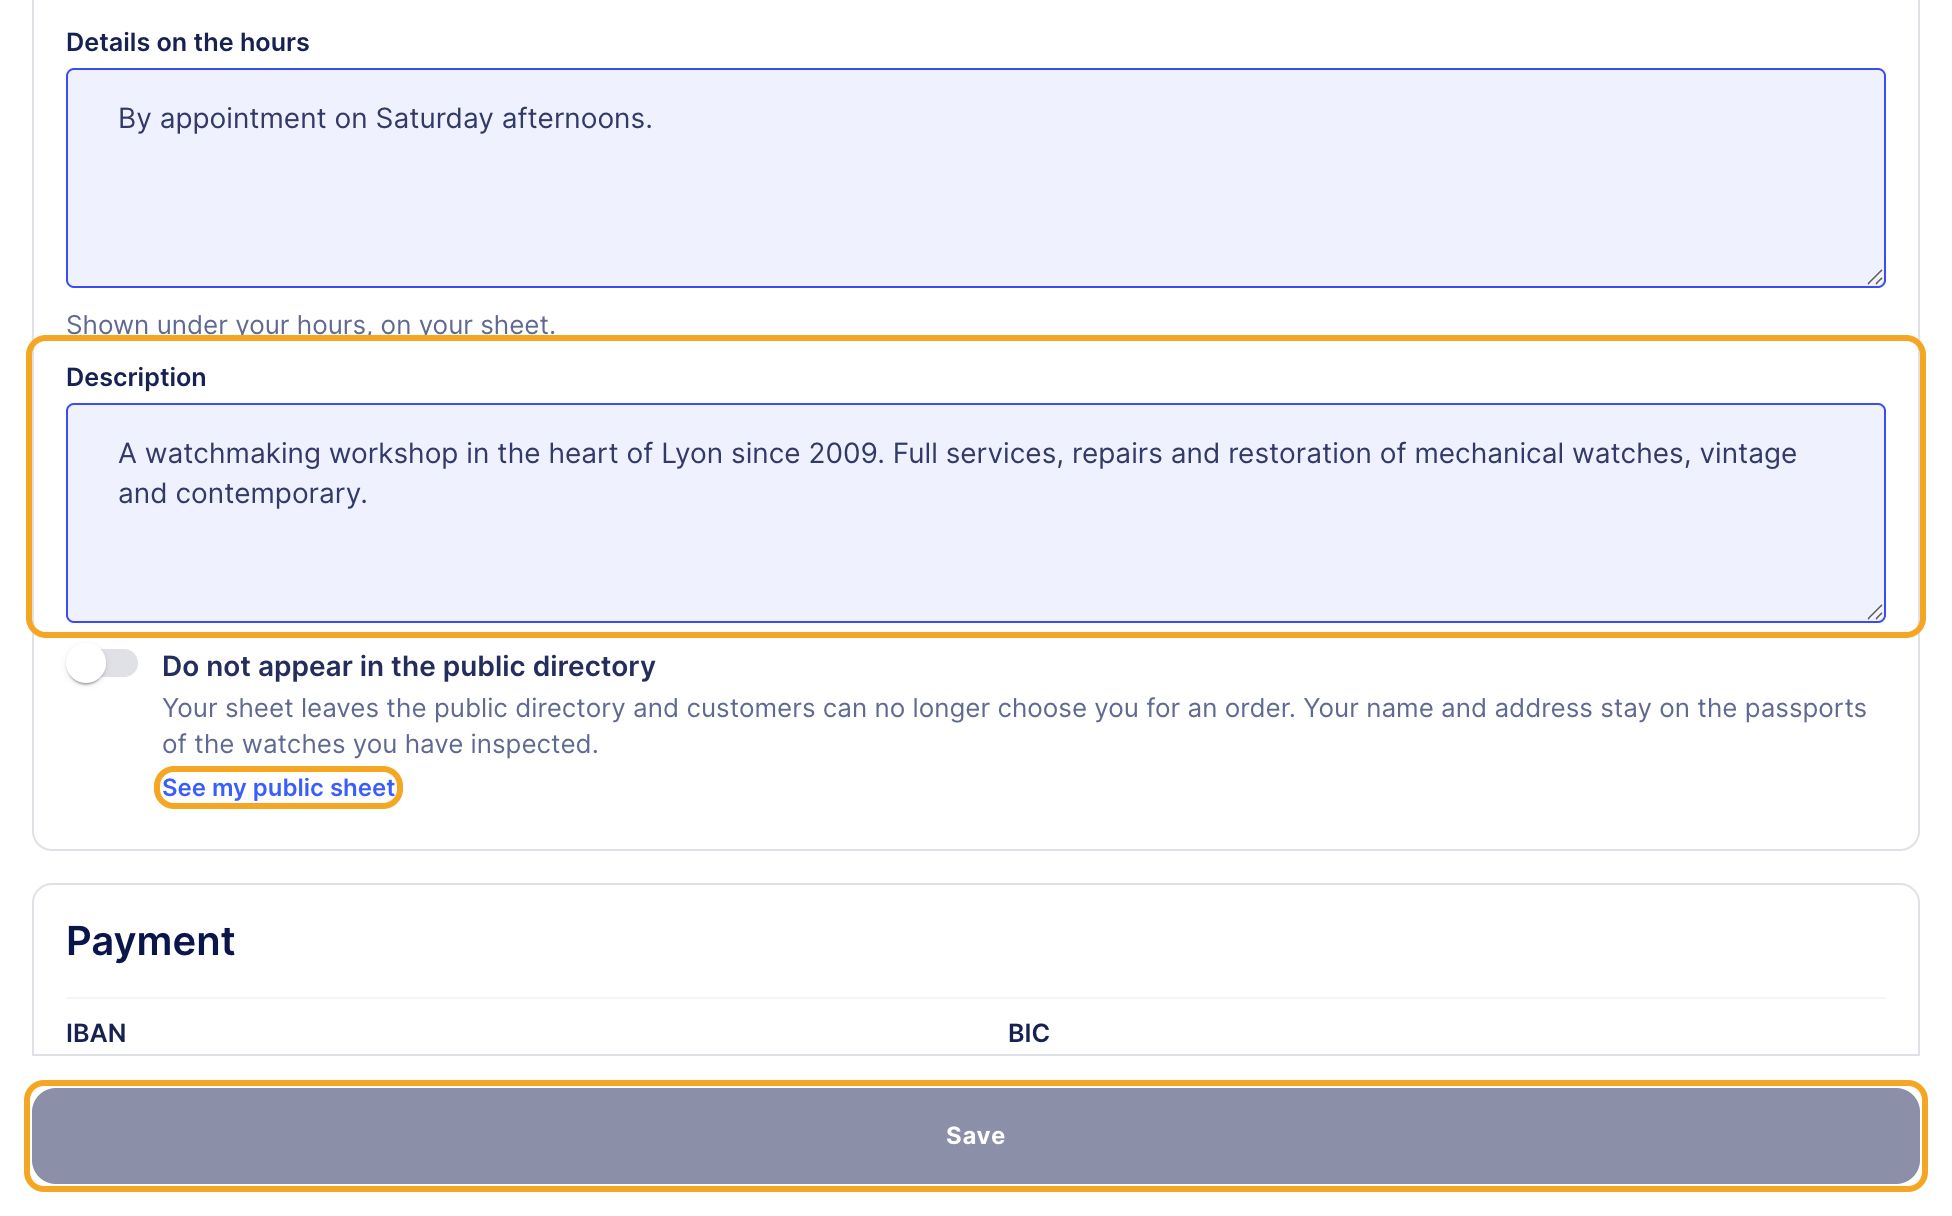
Add Details on the hours if needed, then a Description of your workshop in two or three sentences: your trade, your specialities, since when. Click Save at the bottom of the page: the button turns on as soon as you change a field. The See my public sheet link opens your sheet as your clients see it.
The description, the See my public sheet link and the Save button.
warning_amber
Warning
Turn on Do not appear in the public directory only if you want to leave the directory: your sheet is no longer listed and customers can no longer choose you for an order. Your name and address stay on the passports of the watches you have inspected.
Part C
Your public sheet
Step 13: check your sheet
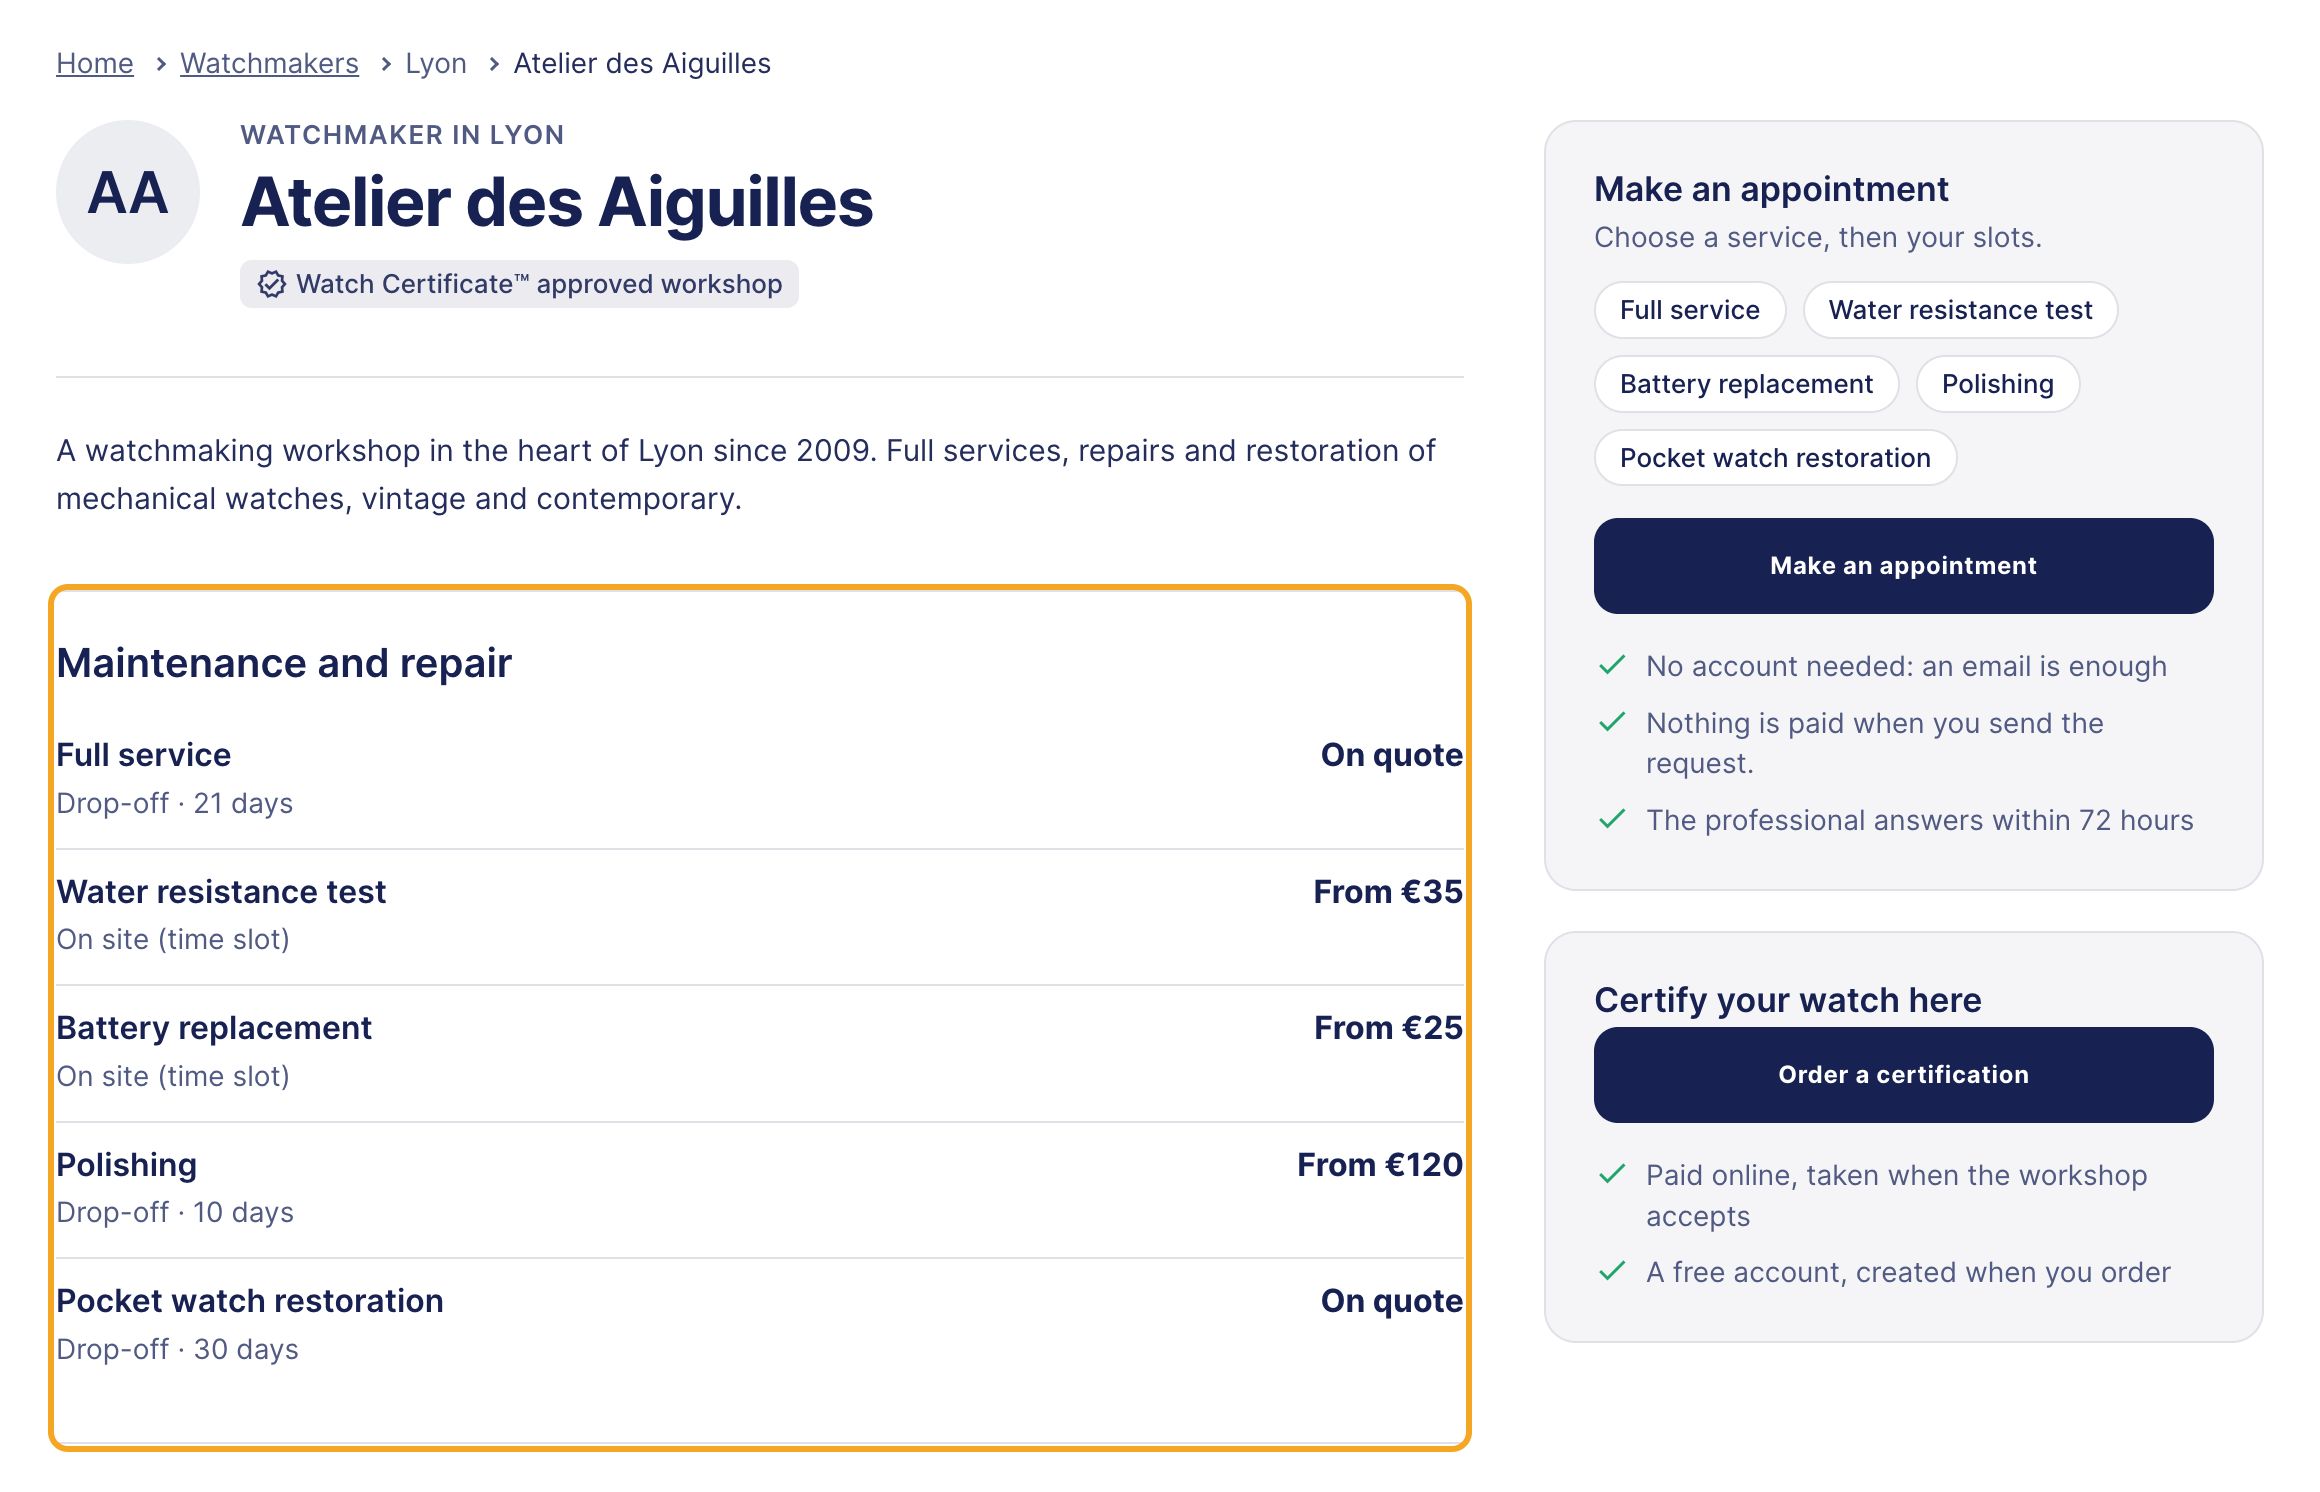
Open it with See my public sheet. At the top, your description, then your services under Maintenance and repair with their price, the ones you added yourself included. On the right, the Make an appointment button offers your services that are on, to any visitor, even without an account: an email is enough. A service that is off does not show.
The sheet as a visitor sees it: the services, the pocket watch restoration among them, and the booking.
Step 14: go back to your settings from the sheet
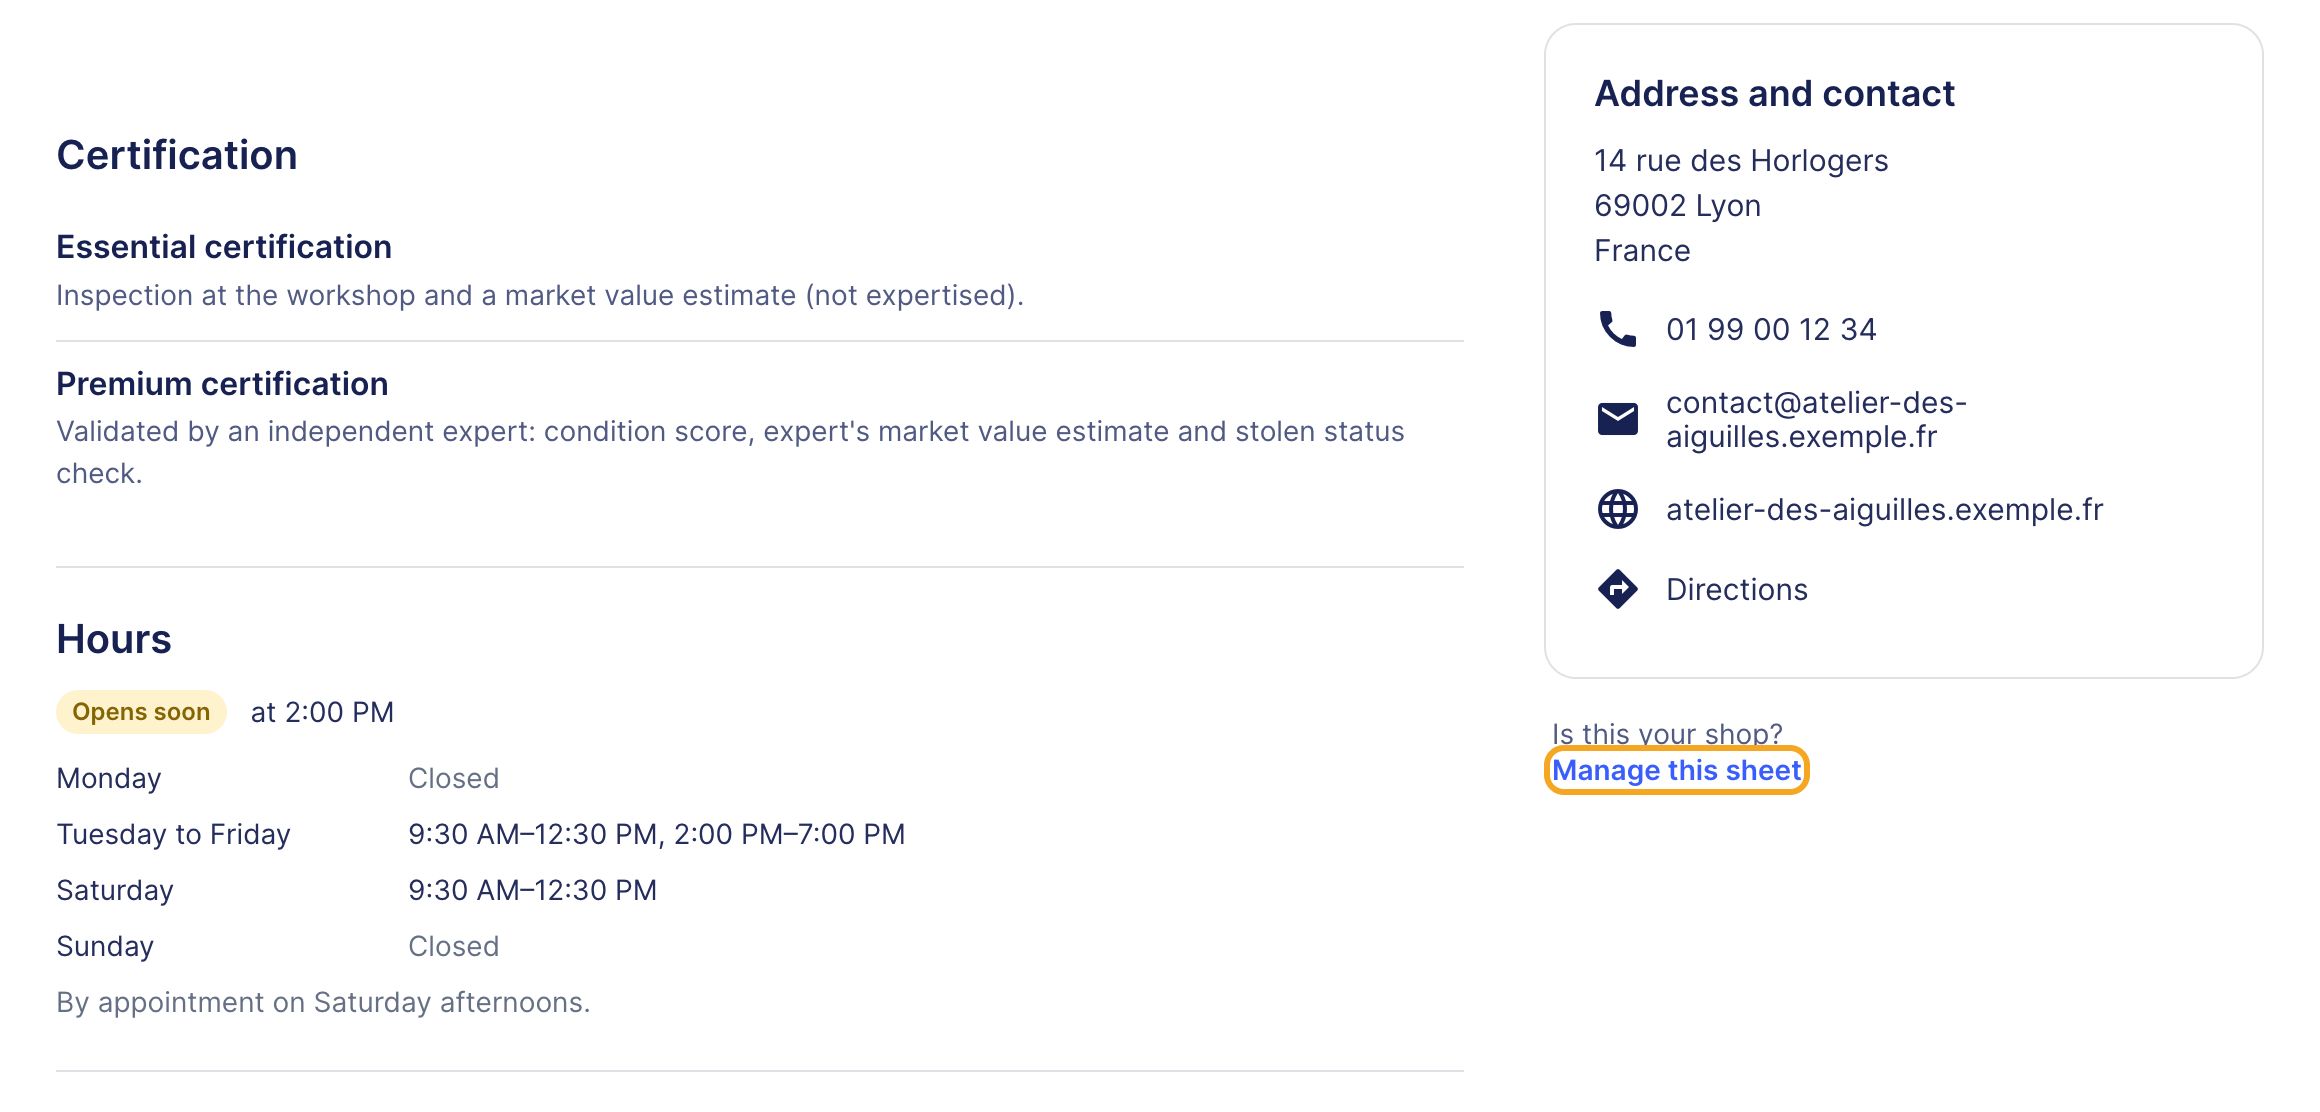
Further down, your Hours show with your details, and the visitor sees whether you are open. On the right, Address and contact shows your address, your phone, your public email and your website. Under it, Manage this sheet takes you back to your Public information. At the very bottom, Brands supported shows your coverage.
The sheet's hours and contact details, and the Manage this sheet link.
In short
Services › My services › Add a service: the service, the price or On quote, on site or drop-off.
Not on the list? A service that is not on the list, its name and its category.
Orders › Coverage: the brands you cover.
Settings › My profile: contact details, Public email, hours, Description, then Save.
See my public sheet to check, and answer appointment requests within 72 hours.
help_outline
Any question?
Click Need help? on your dashboard, or write to your Watch Certificate™ contact. We will get back to you quickly.